Create a project in ClimMob
Sofía Acuña, Marilyn Manrow, Brandon Madriz, Kauê de Sousa
Setting up a new ClimMob project
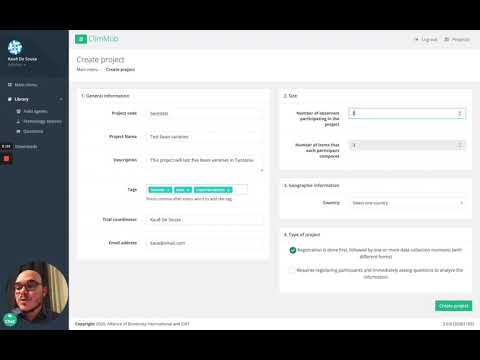
You should have already created a user account in ClimMob (see instructions on how to do that here). To start working with ClimMob, your first step is to create a new project. You can do this in two ways: either by going to the Project Overview section and clicking Create a new project, or by navigating to All projects and selecting Add new project. In both cases, you will be asked to complete a short form with the main project details. Once created, you can always return later to update or adjust the project settings.
To set up a profile for your tricot project. Fields to fill:
- General information
-
Project name: Unique and more descriptive name for the project. We recommend including the technology, the year or time, and the location, to distinguish the project from others, when you manage multiple projects. For example: Bean_Honduras_2019_season1
-
Project ID: Short, unique identifier of the project. For example, your initials and year of the project: JV19.
-
Description: Add more detail about the project.
-
Keywords: To make your project searchable to other users, enter up to X keywords that define your project. Examples: “bean”, “Honduras”.
-
Trial coordinator: Your full name, start with your first name, all names separated by a space. By default, it is already filled with your data. Change if the trial coordinator is someone else.
-
Email address: Your email address.
-
Affiliation: Select one or create a new affiliation, if any of the options applies to your organization.
- Geographic information
- Select the country where the project will take place
- Participants
- Number of participants: Enter how many participants will join this project. For example: 200. If you don’t know the exact number yet, better choose a number too high than too low (but still reasonable, as otherwise ClimMob will do a lot of unnecessary computing later on).
- Technology options labels
- Number of technology options each participant compares: By default, this is set to ‘3’ and cannot be changed. It’s a reminder that in a tricot project, every participant will receive 3 technology options to compare.
- Name given to the 3 items that each participant compares: by default the names are “Option A, Option B and Option C” but the trial coordinator could decide to change them for something else that participants can relate to better, such as numbers, colors or shapes.
- Project type
- You can indicate whether the project is a training project. This means the project was created for educational purposes—such as practice, demonstrations, or coursework—and not intended for actual data collection in the field.
- There are three options for experimental site: on-farm testing, home, or public space (e.g., market). Depending on the experimental site selected, you will need to choose between different units of analysis and corresponding objectives (see examples in box below).
- Do you want to create your project from a SOP template? Select if it applies to your project. Read more about SOPs here.
- Finally, you can select up to four languages in which the participant forms will be provided, allowing multilingual data collection as needed.
Video tutorial
Create a new project
Types of projects
Select technology options
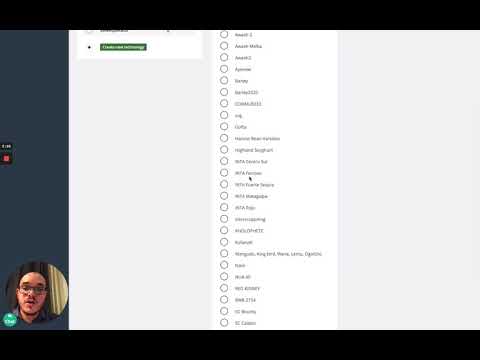
In this section, you can specify the technology options you want to compare in your tricot experiment. For example, if you want to test bean varieties, you would add the names of the bean varieties to be tested here. If you want to test which fertilizer regimes, you would add the names of the fertilizer regimes to be tested.
How-to:
-
On the project overview section click on green button, Select technology options.
-
You will access the list of available technologies in the platform. If the technology you are interested in is there, just click on it and access the different options (e.g. varieties).
-
If the technology you are interested in is not there, click on + add new technology. This action will redirect you to the library, where you can create new technologies.
Video tutorial - Filling the ClimMob library with new technologies (e.g. varieties) to test in the tricot trials
Prepare data collection form
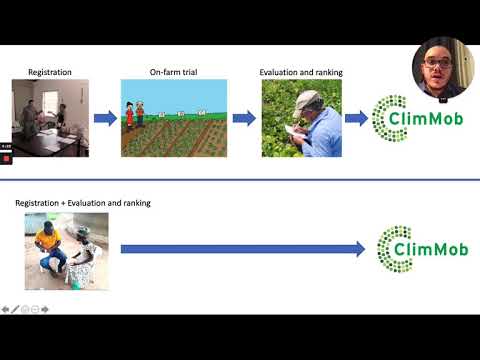
In this section, you define the different data collection moments for the on-farm evaluation that participants will carry out. At each moment, specific questions will be asked to capture observations. It is important to decide:
- Which traits will be evaluated in the selected technology options?
- When will each trait be evaluated during the planting cycle?
Once set up, these data collection forms will guide field agents and participants during the evaluation process.
How-to:
-
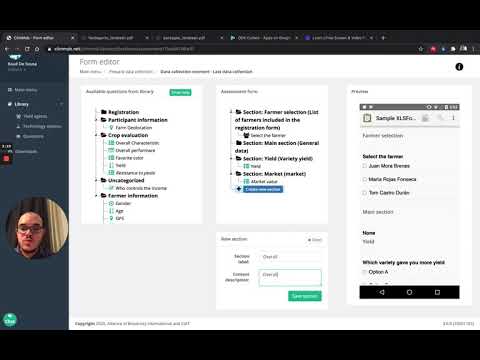
On the project definition section, click Prepare data collection. Here you can add the different data collection moments throughout the planting cycle.
-
After adding the data collection moments, go to the right panel (Active data collection moments) and click Show to view them.
-
For each data collection moment, drag the desired questions from the left panel (available questions from the library) into the middle panel (assessment form). A preview of the selected questions will appear on the right panel (preview)—scroll down to view all questions.
-
If the question you need is not in the library, click Add new question and create it under the most relevant section.
Video tutorials
Project setup - Data collection survey, part 1

Project setup - Data collection survey, part 2
Technology randomization
After setting up your data collection moments and their corresponding questions, the next step is to create test packages through technology randomization. This process ensures that each participant receives a balanced set of technology options for evaluation.
How-to:
-
On the project overview section (right side of the screen), click Generate packages with technology options to open the participant registration form.
-
Set combinations:
- Choose whether to include all technology options or only a selection.
- Define how many packages with each technology option will be generated.
- By default, all technology options are included, and the same number of packages are created for each.
WARNING If you change the number of packages for one technology, you must balance the total by adding or subtracting from others to ensure the same overall number of packages.
-
Review packages and confirm. If the list of packages is not confirmed, it will be lost, and you will need to repeat the randomization.
-
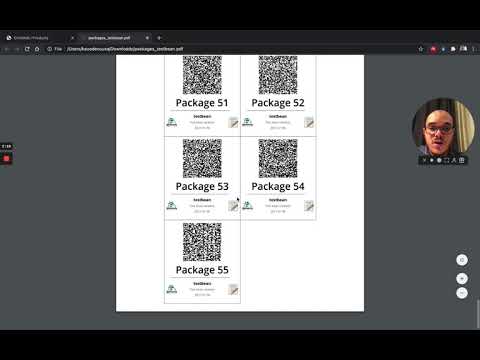
Once confirmed, the randomization documents are available in the Downloads section:
- List of packages with QR codes for the registration form → required for preparing test packages.
- List with randomized trial packages (Excel) → shows the technology combinations assigned to each package. This file is useful when preparing test packages. Do not edit this file.
Video tutorials:
Project setup - Registration files